Risk Scenarios
The VERA Risk Scenario Assessment Process
VERA provides a GAMP 5-based risk assessment feature in the Requirements module of QC/ALM. This feature enables authors to:
- Identify and document risk scenarios
- Trace the scenarios to one or more system requirements
- Assess the risk variables and calculate a risk rating for each scenario (using GAMP 5 risk calculations)
- Document a mitigation strategy for higher-risk scenarios
- Trace the scenarios to test cases
- Submit the completed risk assessments for approval
Identify and Document Risk Scenarios
Start the risk assessment process by creating a new Risk Scenario record for each identified system risk.
Step 1: Analyze the system's intended functionality to identify potential risk scenarios. A risk scenario is any scenario that could have a negative impact on business processes, product quality, data integrity, system security, human safety, regulatory compliance, or any other important system function.
Step 2: For each identified risk scenario, create a new requirement entity in QC/ALM. Use the Risk Scenario requirement type when creating the new record. Provide a description of the scenario in the
Description field and a GxP assessment in the GxP field. Complete other data fields, as applicable. 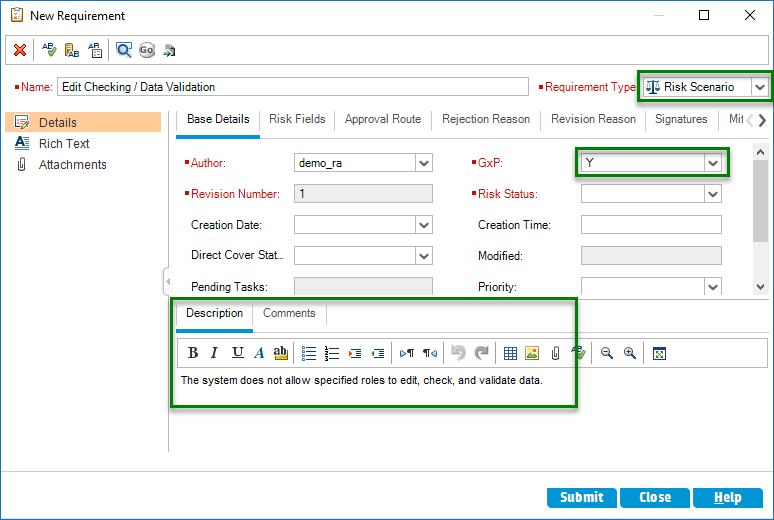
Figure: Use the 'Risk Scenario' requirement type to document risks
Trace to System Requirements
Risk scenarios can be linked to system functions using QC/ALM's native requirement traceability feature.
Step 1: Select to view the Requirement Traceability tab of a risk scenario record.
Step 2: For each system function associated with the risk scenario, use the Trace From command to add traceability between the risk scenario and another requirement representing the associated function. The other requirement can be of any relevant requirement type (Functional, User, Business, Design, etc.) 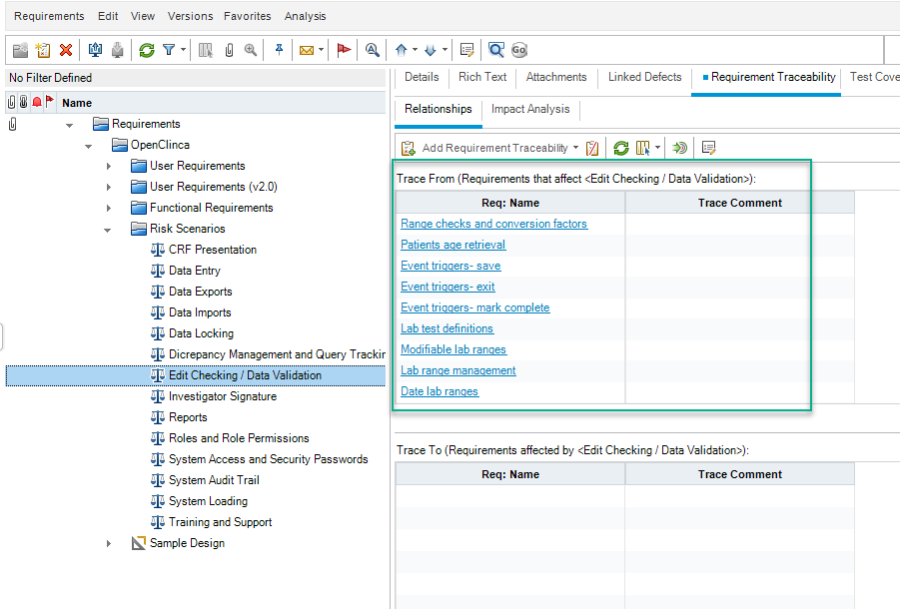
Figure: Use the 'Trace From' command to create traceability between a risk scenario and the associated system functions.
Calculate Risk Values
Evaluate each identified risk scenario and assess its probability of occurrence, the likely severity of harm caused by an occurrence, and the likely detectability of an occurrence. Then update the risk scenario record by providing a value of High, Medium, or Low for each of the three risk variables: Risk Probability, Risk Severity, and Risk Detectability.
The system will automatically calculate and update the Risk Class and Risk Priority fields as the risk variables are selected. The values are calculated in accordance with GAMP 5's risk matrices: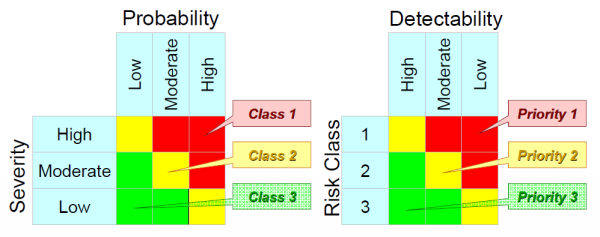
Figure: GAMP 5 Risk Matrices
There are three recommended views for completing the risk assessment information: Requirement Details dialog, Requirement Details view, and the Requirement Tree view: 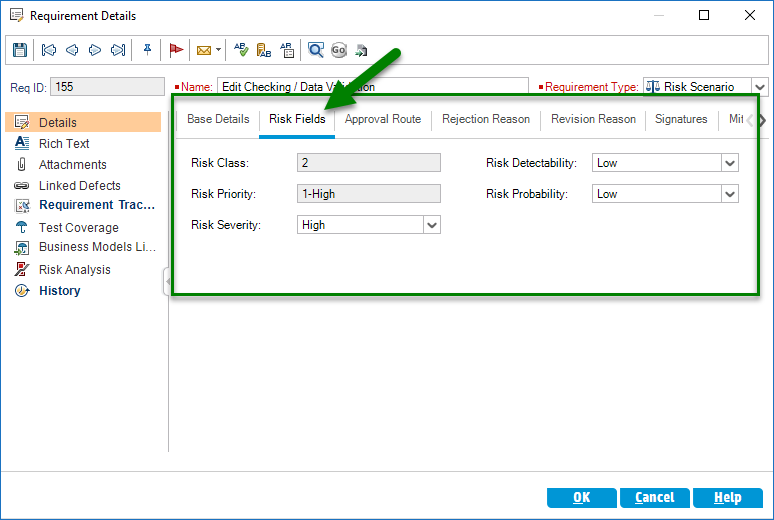
Figure: The 'Requirement Details' dialog. Use the Risk Fields tab in this dialog to view and update the fields of the record's risk assessment.
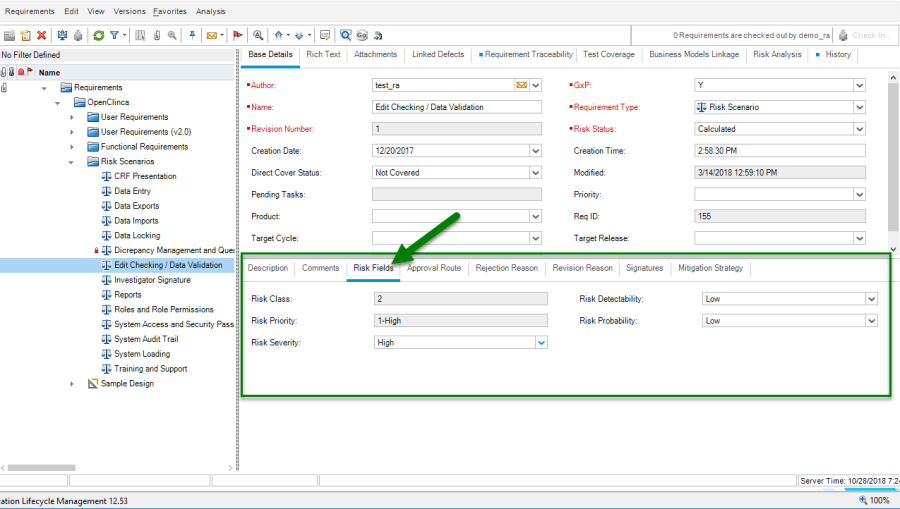
Figure: The 'Requirement Details view. The Risk Fields tab is also available directly in the Requirement Details view.
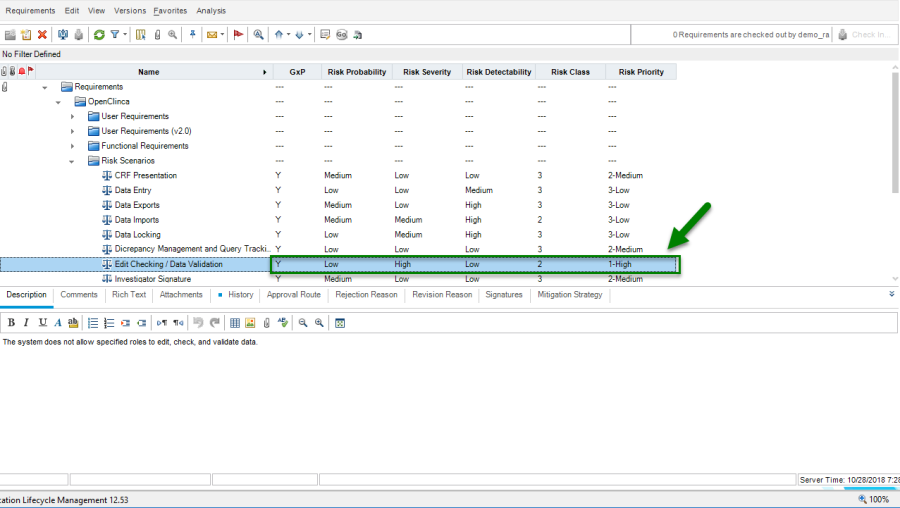
Figure: The 'Requirement Tree' view. The user can easily navigate between requirements, view relevant information, and edit risk data in a single view.
Document a Mitigation Strategy
As needed, use the Mitigation Strategy field of a risk scenario to document a strategy for reducing the risk rating. Additional system functions or design elements, enhanced monitoring and alerting, specialized user training, and more rigorous system testing are all examples of strategies that might be used to mitigate a given risk scenario.
NOTE: In accordance with GAMP 5 recommendations, a mitigation strategy is mandatory for risk scenarios with a Risk Priority of High. The user will not be able to submit a risk scenario for approval when it has a high-risk rating and no mitigation strategy.
Add Test Coverage
Test cases that are associated with a risk scenario can be linked to the risk scenario record using QC/ALM's Test Coverage feature.
Step 1: Select to view the Test Coverage tab of a risk scenario record.
Step 2: For test case from the Test Plan module that is associated with the risk scenario, use the Add to Coverage command to add traceability between the risk scenario and test. 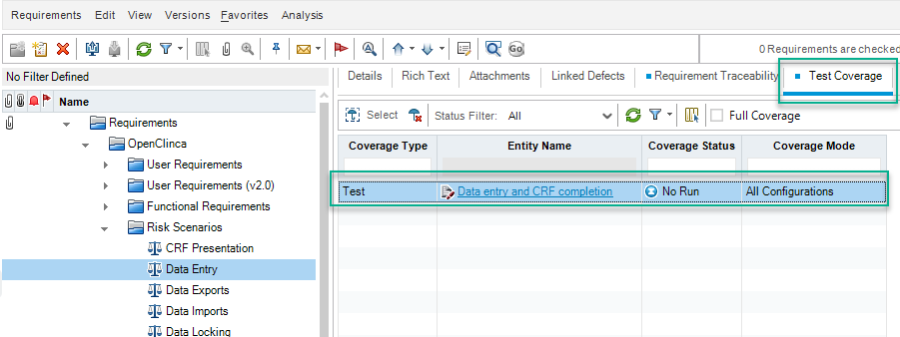
Figure : Use the 'Test Coverage' feature to associate one or more test cases with a risk scenario.
Submit for Electronic Approval
Once a risk scenario has been assessed, calculated, mitigated, and covered by appropriate testing, it will be ready for approval.
Reference Electronic Record Approvals for more information about VERA's approval features. Reference Start Approval Routes in Requirements module for specific details on submitting a risk scenario for approval.
Table of Contents