Integrate VERA Workflow States into Jira Workflows
- Mary Nghe
- Henry Farris (Unlicensed)
This guide will show you how to configure new or existing workflows to include VERA workflow states. The VERA workflow include Routing for Approval, Approved, and Rejected VERA states. Statuses are allowed to exist before the Routing for Approval state as long as VERA states are set up correctly.
Prerequisites
This guide documents how to create a fully integrated VERA Jira workflow. The following prerequisites must be completed prior to integrating the VERA workflow:
Step-by-Step Guide
- Navigate to the Jira Administration Settings > Issues > Workflows
- Click on the Edit button on the appropriate workflow
Add the following VERA statuses as new steps:
Step Linked Status Routing for Approval Routing for Approval Rejected Rejected Approved Approved Add the following property keys for ALL statuses except the first workflow status (e.g. To-Do, New, etc):
- Workflows that leverage VERA functionality need to have the delete, move, and clone actions disabled for each workflow state other than the first workflow state.
- The default permission scheme in Jira provides administrators the ability to use the delete and move actions in all workflow states. To allow non-administrator users these abilities, grant the permission to the preferred users in Issues > Permission Schemes.
The value "Tx3 VERA Workflow Lock" is not a real username and can be replaced with any fictitious value. The intent of this configuration is to restrict these actions to a fictitious user, ensuring that no actual user will be able to perform them.
Property Key Property Value * jira.permission.delete.user Tx3 VERA Workflow Lock jira.permission.move.user Tx3 VERA Workflow Lock jira.permission.createclone.user Tx3 VERA Workflow Lock
- Workflows that leverage VERA functionality need to have the delete, move, and clone actions disabled for each workflow state other than the first workflow state.
Add the following property key to all VERA statuses (Routing for Approval, Rejected, Approved):
- VERA workflow states must be locked to prevent anyone other than the VERA service account from performing editing actions in VERA states.
Fill in the appropriate VERA service account's username in the property value below.
Property Key Property Value * jira.permission.edit.user <username of VERA service account> .
Create transitions for the VERA statuses
- All VERA statuses must be named according to the chart below and cannot be changed. The transitions between each status, however, are flexible and does not have to follow any naming convention.
All transitions listed are required except the Revise transition.
Transition From Example Transition Name Transition To Purpose of the Transition <Previous non-VERA status> Start Approval(s) Routing for Approval Trigger the VERA Approval Route Routing for Approval Complete Approval Approved Required for VERA service account to transition record to Approved when all approvers have signed the record Routing for Approval Complete Rejection Rejected Required for VERA service account to transition record to Rejected if the issue has been rejected Routing for Approval Withdraw Approval(s) <Previous non-VERA status> Allows Jira Admins to roll back the Jira issue if the VERA Approval Route fails Rejected Withdraw Approval(s) <Previous non-VERA status> Allows users to withdraw and edit the rejected record Approved Revise <Previous non-VERA status> (Optional) Allows users to revise and rework the previously approved record .
For each VERA transition, add the appropriate options:
- Webhooks must be added to the appropriate transitions to trigger approval route activities in VERA.
- After adding the webhook as a post function, move the webhook transition to be the last post function.
- Conditions must be added to the appropriate transitions so that only the VERA service account will have permissions to execute these transitions.
Transition Name Option Option Name Option Parameter Start Approval(s) Post Function Trigger a Webhook Start VERA Approval Route Withdraw Approval(s) Post Function Trigger a Webhook Cancel VERA Approval Route Revise Post Function Trigger a Webhook Revise VERA Record Complete Approval Condition User Is In Project Role Tx3 VERA System Complete Rejection Condition User Is In Project Role Tx3 VERA System
- Webhooks must be added to the appropriate transitions to trigger approval route activities in VERA.
- Click Publish Draft to save the newly VERA integrated workflow
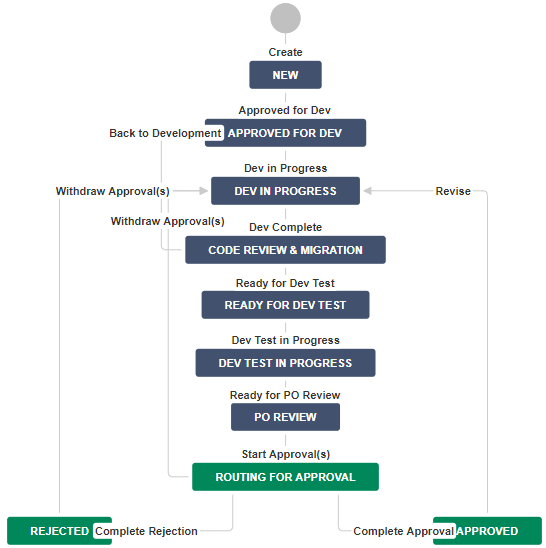
Example Jira workflow that has been integrated with VERA.