Add the VERA Service Account to the VERA System Role
This step is required DEPENDING on how the VERA System Role was originally configured. The Jira Administrator may need to add the VERA service account to the VERA system role:
- For any existing projects that are converted to VERA, manually add the VERA service account to the VERA System role.
- For any newly created projects, the VERA service account will be added by default, and can be removed if VERA will not be enabled on that project.
Alternatively, utilize this guide to ensure that the VERA service account was correctly added to the VERA system role for the Jira project. For more information on the VERA System Role, please refer to the Create the VERA System Role guide. Follow the steps below to add the VERA Service Account to the VERA System Role.
Prerequisites
The service account and the system role must be created as a prerequisite to this article.
Step-by-Step Guide for Jira Server
For more detailed information on Project Roles in Jira Server, refer to Atlassian's documentation.
- Navigate to the Jira Administration Settings > Projects > Projects tab
- Locate and click on the Jira project to edit
- Click the project name
- Click on Users and Roles
- Click on Add Users to a Role button
- Add the VERA Service account into this project, select the Tx3 VERA System role, and click Add
Step-by-Step Guide for Jira Cloud
For more information on Project Roles in Jira Cloud, refer to Atlassian's documentation .
- Navigate to the Jira Administration Settings > Projects > Manage Projects
- Locate and click on the Jira project to edit
- Click the additional menu icon and click Project Settings
- Click on People
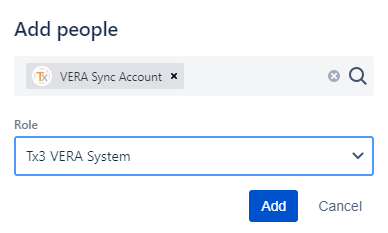
- Click on Add People button
- Add the VERA Service account into this project, select the Tx3 VERA System role, and click Add